What Does a Good Weld Bead Look Like?
What Should a Proper Weld Bead Look Like?
It's about consistency, penetration, and finish. It takes practice , but understanding what you're aiming for speeds up the learning curve considerably.
Let's break down what separates a clean, professional bead from one that'll have you reaching for the grinder.
The Anatomy of a Good Weld Bead
A proper weld bead has five defining characteristics. Miss any of these, and you've likely got a weak joint or one that won't pass inspection.
1. Shape and Profile
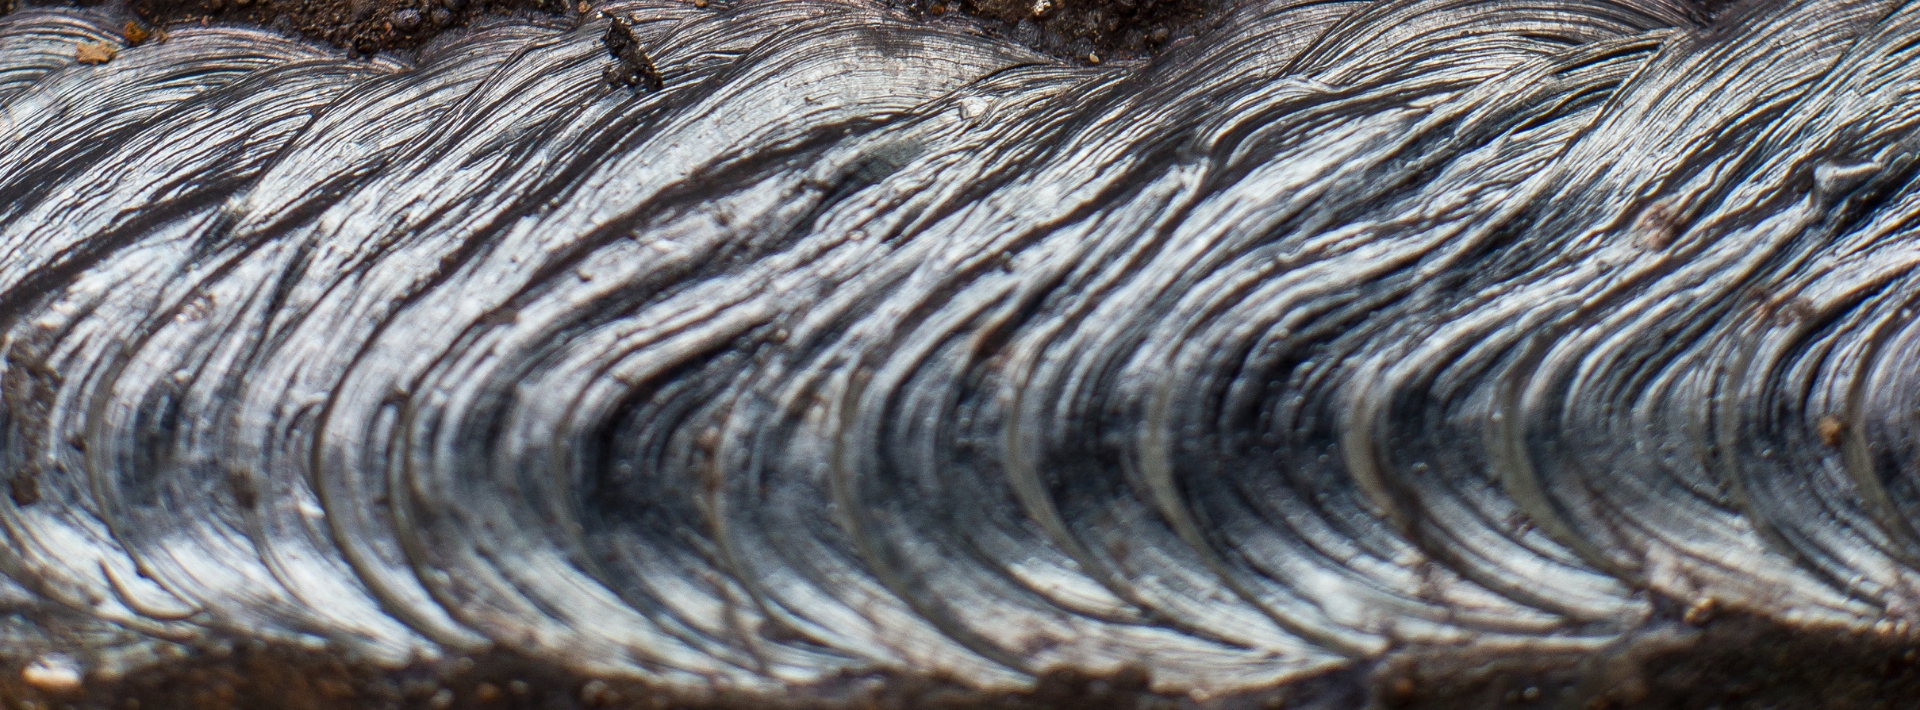
A good weld bead should be slightly convex,like a gentle crown, rather than a steep peak. It should be uniform in width and height along the entire length of the weld. No peaks. No valleys. Just consistent metal deposited evenly.
What to avoid: Excessive convexity (too much filler piled on top) wastes material and creates stress points. A concave bead suggests insufficient filler or poor technique.
2. Uniformity and Ripple Pattern
Those ripples you see? They're called "stack of dimes" in TIG welding or "fish scales" in MIG. They should be evenly spaced, consistent in size, and flow smoothly from start to finish. This tells you your travel speed and heat input were steady.
What to avoid: Erratic ripples mean inconsistent travel speed. Wide gaps between ripples suggest you're moving too fast.
3. Penetration
You can't always see penetration from the surface, but you can infer it. A good weld should tie into the base metal properly. On thinner material, you might see slight discolouration on the backside (if accessible), indicating full penetration without burn-through.
What to avoid: Lack of fusion is the silent killer. The weld looks fine on top, but it hasn't bonded properly to the base metal. Cold laps and undercut are visual clues.
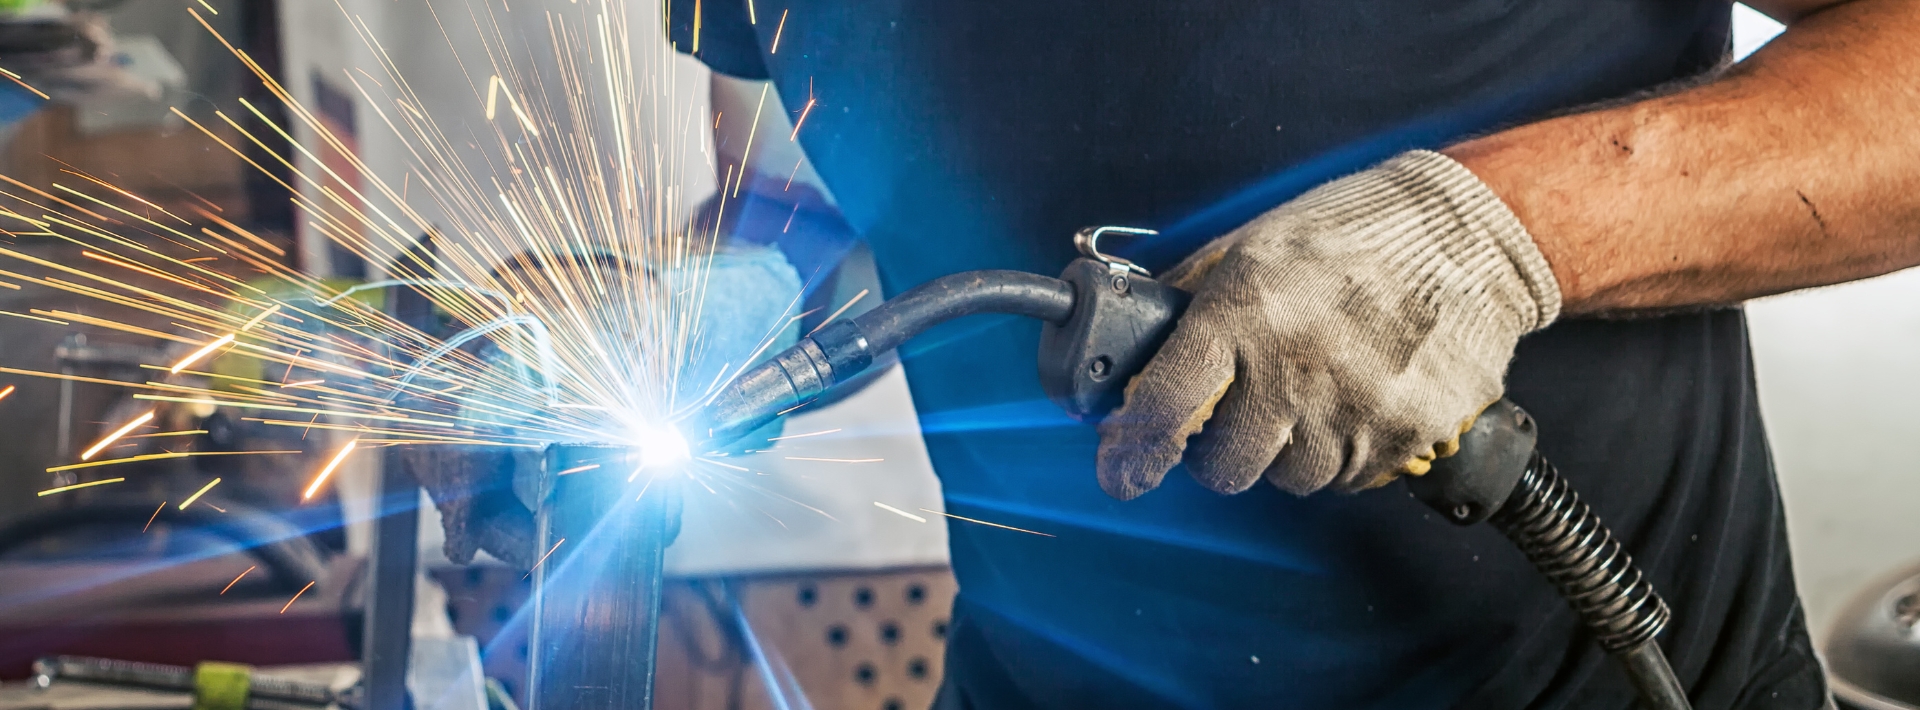
4. Minimal Spatter
Spatter happens. But excessive spatter covering your workpiece like steel confetti means something's off. Either your voltage was too high, wire fed too fast, or contaminated metal.
A clean weld has very little spatter, and what's there brushes off easily.
5. Surface Finish
The bead should be smooth and free from porosity (those little pinholes), cracks, or inclusions. The transition between the weld and base metal (the toe of the weld) should be smooth, not undercut or overlapping.
Common Mistakes Beginners Make
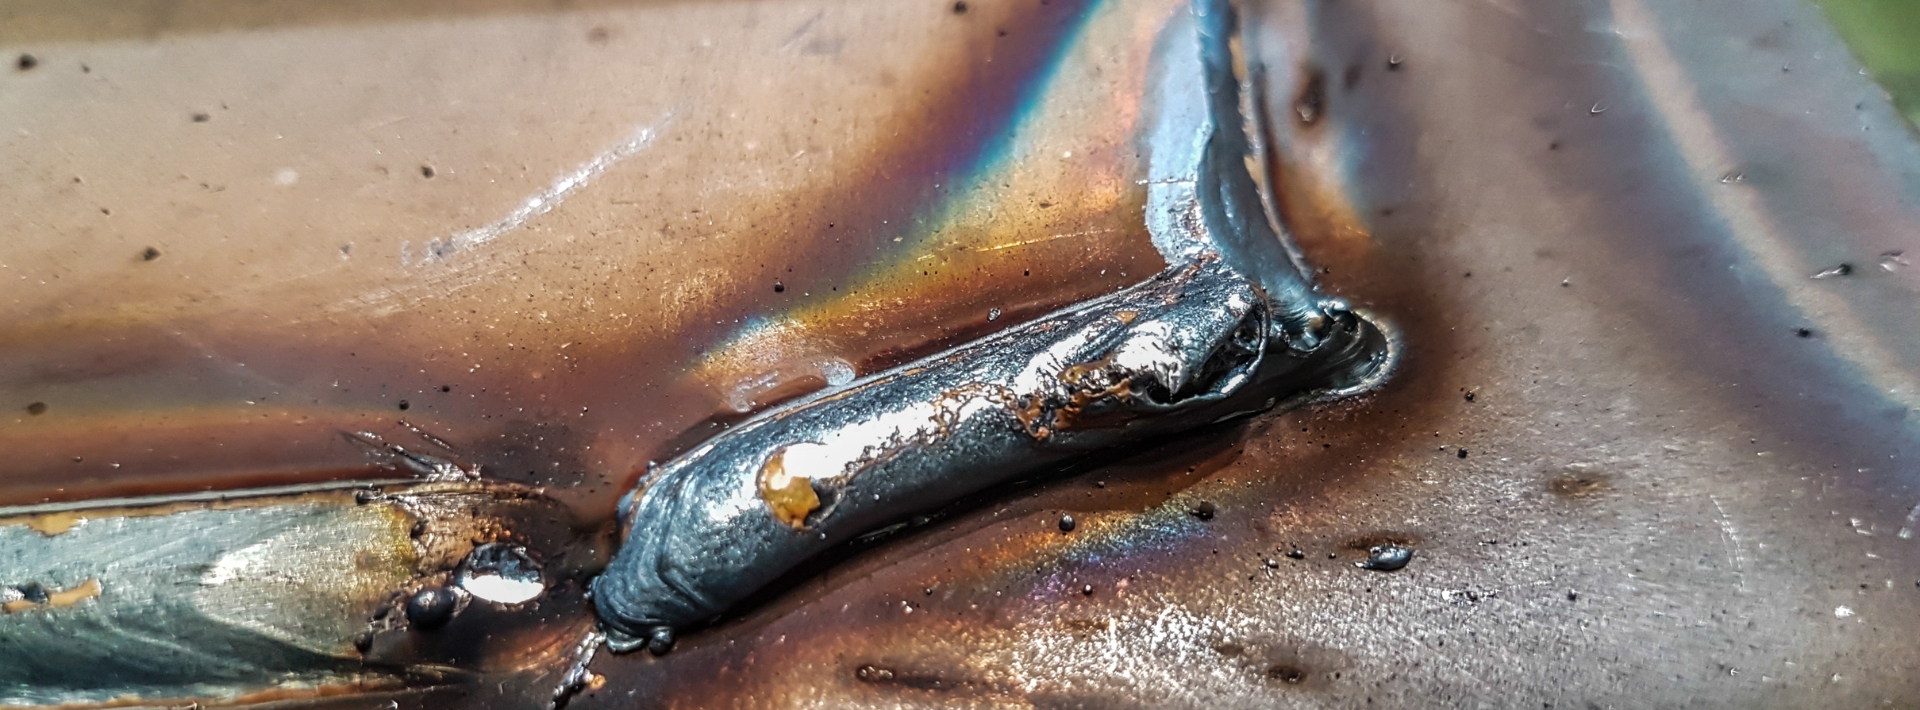
Undercutting
This is a groove melted into the base metal at the toe of the weld. It happens when your heat is too high or your travel speed too slow. Undercut weakens the joint significantly.
How to spot it: Run your finger along the edge of the bead. If there's a sharp dip, you've got undercut.
Lack of Fusion
The weld metal hasn't properly bonded to the base metal or to previous weld passes. It's often invisible on the surface but detrimental for strength.
How to spot it: Look for a sharp, defined edge where the weld meets the base metal rather than a smooth transition. Cold laps and slag inclusions are red flags.
Porosity
Those tiny holes (or sometimes larger cavities) are caused by trapped gas—usually from contamination, moisture, or improper shielding gas coverage.
How to spot it: Porosity is usually easy to spot. If your bead is full of small holes or cavities, it indicates a problem.
Excessive Spatter
As mentioned, spatter indicates improper settings or dirty metal. It's also a pain to clean up.
How to spot it: If you're spending more time with a wire brush than welding, adjust your settings.
Improving Weld Quality: Practical Tips
Get Your Settings Right
Voltage and wire feed speed (for MIG) or amperage (for Stick and TIG) need to be in the correct range for your material thickness. Too hot and you burn through or undercut. Too cold and you get poor penetration and a lumpy bead.
Start with Adendorff Machinery Marts recommendations and fine-tune from there.
The MAC AFRIC MIG 195 Compact MIG Welder and MIG 200 Inverter Welder offer adjustable settings that let beginners dial in the sweet spot without guesswork. Digital displays and clear voltage/amperage controls make a real difference when you're still learning.
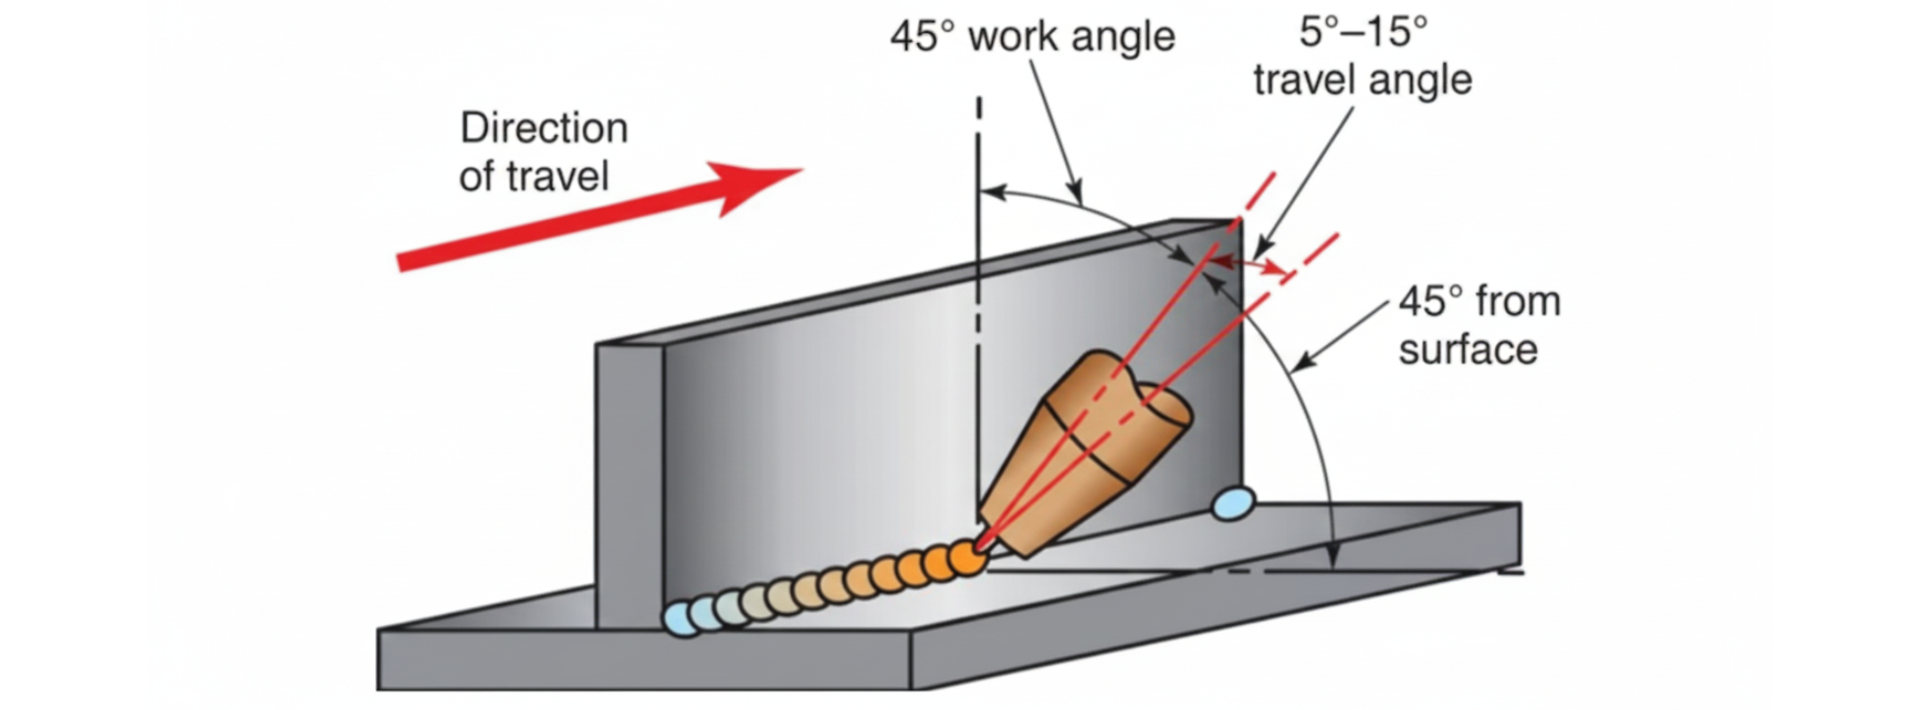
Control Your Travel Speed
Too fast and you get a narrow, ropey bead with poor penetration. Too slow and you create excessive build-up, spatter, and potential burn-through.
Aim for a consistent speed that allows the puddle to flow smoothly behind the electrode. Practice on scrap until you know the rhythm.
Prepare Your Base Metal
This cannot be overstated. Rust, paint, oil, and mill scale will ruin a weld faster than poor technique. Clean metal means fewer defects, less spatter, and better penetration.
Wire brush it. Grind it if necessary. Use a degreaser if there's oil residue. It's the most boring part of welding, but it's also the most important.
Choose the Right Consumables
Wrong wire diameter, incorrect electrode type, or contaminated filler material will sabotage your efforts. Match your consumables to the base metal and thickness.
For mild steel, ER70S-6 wire (MIG) or 6013/7018 electrodes (Stick) are solid all-purpose choices. For aluminium, you'll need specific wire and gas.
What to Expect from Different Welding Processes
Different processes produce different-looking beads. Knowing what's normal for each helps you set realistic expectations.
MIG Welding
MIG produces a fairly smooth bead with a slightly textured surface. Properly set up, it's one of the cleanest processes for beginners. The continuous wire feed makes it forgiving, and the shielding gas protects the weld from contamination.
Typical bead appearance: Slightly convex, uniform ripples, minimal spatter (if settings are correct).
Best for: General fabrication, automotive work, thicker materials.
The MAC AFRIC MIG 195 and MIG 200 models are designed for ease of use. They handle flux-cored wire (no gas required) and solid wire with gas, giving you flexibility as you learn.
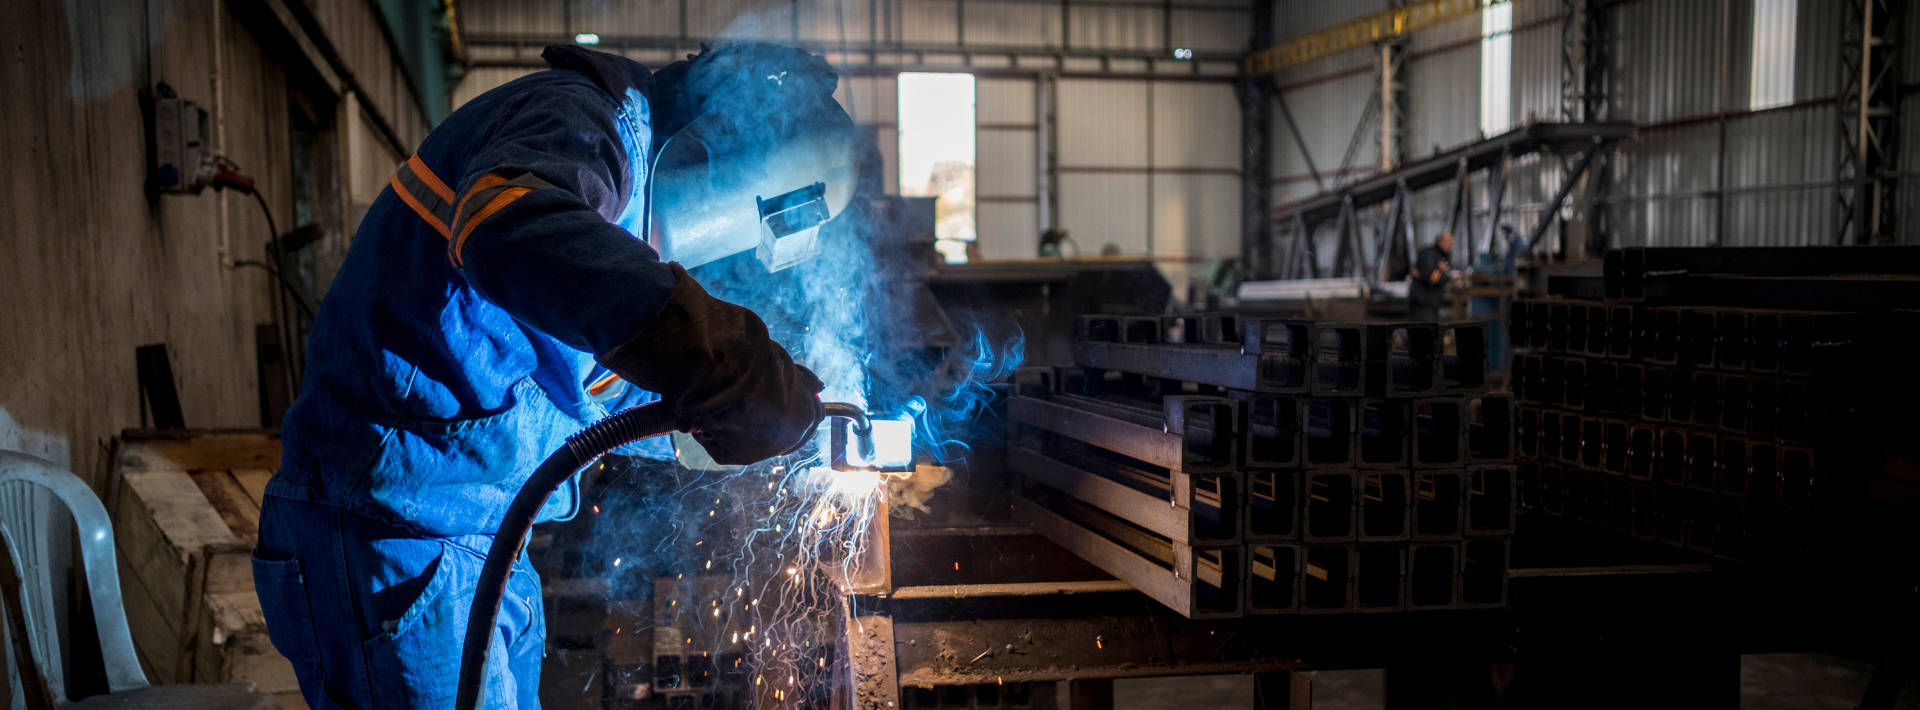
Stick Welding
Stick welding produces a coarser, more textured bead with a slag coating that needs chipping off. It's more forgiving with dirty metal and wind (no shielding gas), but it's also less forgiving with technique.
Typical bead appearance: Rougher surface, visible ripples once slag is removed, prone to more spatter than MIG.
Best for: Outdoor work, thicker materials, repairs, farm and construction jobs.
The MAC AFRIC 190A Arc Inverter Welder is a reliable workhorse for beginners tackling Stick welding. Inverter technology provides a stable arc, which translates to more consistent beads and fewer headaches.
TIG Welding
TIG produces the cleanest, most precise beads of any process. The famous "stack of dimes" appearance comes from controlled heat input and manual filler rod feeding. It's slower and requires more skill, but the results are beautiful.
Typical bead appearance: Smooth, shiny, even ripples, minimal to no spatter, clean edges.
Best for: Aluminium, stainless steel, thin materials, anything requiring a high-quality finish.
Our MAC AFRIC TIG inverters offer high-frequency start and adjustable amperage control, making it easier to establish a stable arc and maintain consistent heat. Critical for achieving that clean TIG aesthetic.
The Right Machine for the Job
Here's the truth: a quality welder won't make you an expert overnight, but a poor one will actively work against you. Inconsistent arc, limited adjustability, and unreliable performance turn learning into frustration.
MAC AFRIC welders provide stable output, clear controls, and enough adjustability to grow with your skills. Whether you're starting with MIG for general repairs, Stick for outdoor projects, or TIG for precision work, having a machine that responds predictably to your inputs makes all the difference.
The MIG 195 Compact is ideal for garage hobbyists working on lighter projects.
The MIG 200 Inverter steps up to handle thicker material and offers dual-voltage capability.
The 190A Arc Inverteris your go-to for farm repairs and construction.
And the TIG inverters let you tackle aluminium and stainless with confidence.
Essential Gear for Clean, Safe Welds
Good welds start with preparation and end with proper finishing. Having the right accessories matters.
Auto-Darkening Helmets
An auto-darkening helmet lets you position your torch with both hands and a clear view, then reacts instantly when the arc strikes. Your beads will be straighter, and your neck will thank you.
Quality Gloves
Heat control is technique control. Proper welding gloves protect your hands while maintaining enough dexterity to guide your torch smoothly.
Clamps and Fixtures
Movement during welding ruins beads. Magnetic clamps and welding clamps to keep your workpieces exactly where you need them, eliminating the wobble that leads to uneven penetration.
Chipping Hammers and Wire Brushes
Especially for Stick welding, you need to remove slag between passes to avoid inclusions. A good chipping hammer and wire brush are non-negotiable.
Grinding and Finishing Tools
Not every bead will be perfect. Having an angle grinder handy means you can clean up mistakes and prepare metal properly before welding.
Grinding and Finishing Tools
Not every bead will be perfect. Having an angle grinder handy means you can clean up mistakes and prepare metal properly before welding.
The Learning Curve
Let's be honest: your first few dozen beads will be ugly. You'll burn through metal, create cold laps, and produce spatter.
This is normal.
Welding is a physical skill. Your brain needs to coordinate heat input, travel speed, torch angle, and filler rod feeding (if applicable) simultaneously. That takes time.
But every bead you run teaches you something. You start to feel when the puddle is too hot or too cold. You recognise the sound of a good arc versus a struggling one. You develop muscle memory for consistent travel speed.The difference between a hobbyist who gives up and one who gets competent is simply this practice and the right equipment.
Final Thoughts
A good weld bead is uniform, properly penetrated, free from defects, and aesthetically consistent. Achieving it requires clean metal, correct settings, steady hands, and patience.
Our MAC AFRIC welders give you the stable, adjustable platform you need to develop those skills. Pair them with proper safety gear, quality consumables, and scrap metal for practice, and you'll see improvement faster than you'd expect.
Mastering bead quality isn't about natural talent. It's about repetition, observation, and having tools that don't sabotage your efforts.
Visit Adendorff Machinery Mart to explore the full range of MAC AFRIC welders, helmets, gloves, and accessories. Whether you're fixing a gate or building a trailer, the right gear matters.

What Should a Proper Weld Bead Look Like?
A quality weld isn't just about strength. It's about consistency, penetration, and finish. It takes practice, but understanding what you're aiming for speeds up the learning curve considerably.
Let's break down what separates a clean, professional bead from one that'll have you reaching for the grinder.
The Anatomy of a Good Weld Bead
A proper weld bead has five defining characteristics. Miss any of these, and you've likely got a weak joint or one that won't pass inspection.
1. Shape and Profile
A good weld bead should be slightly convex, like a gentle crown, rather than a steep peak. It should be uniform in width and height along the entire length of the weld. No peaks. No valleys. Just consistent metal deposited evenly.
What to avoid: Excessive convexity (too much filler piled on top) wastes material and creates stress points. A concave bead suggests insufficient filler or poor technique.
2. Uniformity and Ripple Pattern
Those ripples you see? They're called "stack of dimes" in TIG welding or "fish scales" in MIG. They should be evenly spaced, consistent in size, and flow smoothly from start to finish. This tells you your travel speed and heat input were steady.
What to avoid: Erratic ripples mean inconsistent travel speed. Wide gaps between ripples suggest you're moving too fast.
3. Penetration
You can't always see penetration from the surface, but you can infer it. A good weld should tie into the base metal properly. On thinner material, you might see slight discolouration on the backside (if accessible), indicating full penetration without burn-through.
What to avoid: Lack of fusion is the silent killer. The weld looks fine on top, but it hasn't bonded properly to the base metal. Cold laps and undercut are visual clues.
4. Minimal Spatter
Spatter happens. But excessive spatter covering your workpiece like steel confetti means something's off. Either your voltage was too high, wire fed too fast, or contaminated metal. A clean weld has very little spatter, and what's there brushes off easily.
5. Surface Finish
The bead should be smooth and free from porosity (those little pinholes), cracks, or inclusions. The transition between the weld and base metal (the toe of the weld) should be smooth, not undercut or overlapping.

Common Mistakes Beginners Make
Undercutting
This is a groove melted into the base metal at the toe of the weld. It happens when your heat is too high or your travel speed too slow. Undercut weakens the joint significantly.
- How to spot it: Run your finger along the edge of the bead. If there's a sharp dip, you've got undercut.
Lack of Fusion
The weld metal hasn't properly bonded to the base metal or to previous weld passes. It's often invisible on the surface but detrimental for strength.
- How to spot it: Look for a sharp, defined edge where the weld meets the base metal rather than a smooth transition. Cold laps and slag inclusions are red flags.
Porosity
Those tiny holes (or sometimes larger cavities) are caused by trapped gas—usually from contamination, moisture, or improper shielding gas coverage.
- How to spot it: Porosity is usually easy to spot. If your bead is full of small holes or cavities, it indicates a problem.
Excessive Spatter
As mentioned, spatter indicates improper settings or dirty metal. It's also a pain to clean up.
- How to spot it: If you're spending more time with a wire brush than welding, adjust your settings.

Improving Weld Quality: Practical Tips
Get Your Settings Right
Voltage and wire feed speed (for MIG) or amperage (for Stick and TIG) need to be in the correct range for your material thickness. Too hot and you burn through or undercut. Too cold and you get poor penetration and a lumpy bead.
Start with Adendorff Machinery Mart’s recommendations and fine-tune from there.
The MAC AFRIC MIG 195 Compact MIG Welder and MIG 200 Inverter Welder offer adjustable settings that let beginners dial in the sweet spot without guesswork. Digital displays and clear voltage/amperage controls make a real difference when you're still learning.
Control Your Travel Speed
Too fast and you get a narrow, ropey bead with poor penetration. Too slow and you create excessive build-up, spatter, and potential burn-through. Aim for a consistent speed that allows the puddle to flow smoothly behind the electrode. Practice on scrap until you know the rhythm.
Prepare Your Base Metal
This cannot be overstated. Rust, paint, oil, and mill scale will ruin a weld faster than poor technique. Clean metal means fewer defects, less spatter, and better penetration. Wire brush it. Grind it if necessary. Use a degreaser if there's oil residue.
Choose the Right Consumables
Wrong wire diameter, incorrect electrode type, or contaminated filler material will sabotage your efforts. Match your consumables to the base metal and thickness. For mild steel, ER70S-6 wire (MIG) or 6013/7018 electrodes (Stick) are solid all-purpose choices. For aluminium, you'll need specific wire and gas.

What to Expect from Different Welding Processes
MIG Welding (GMAW)
- Typical bead appearance: Slightly convex, uniform ripples, minimal spatter (if settings are correct).
- Best for: General fabrication, automotive work, thicker materials.
Stick Welding (SMAW)
- Typical bead appearance: Rougher surface, visible ripples once slag is removed, prone to more spatter than MIG.
- Best for: Outdoor work, thicker materials, repairs, farm and construction jobs.
TIG Welding (GTAW)
- Typical bead appearance: Smooth, shiny, even ripples, minimal to no spatter, clean edges.
- Best for: Aluminium, stainless steel, thin materials, anything requiring a high-quality finish.
The Right Machine for the Job
Here's the truth: a quality welder won't make you an expert overnight, but a poor one will actively work against you. Inconsistent arc, limited adjustability, and unreliable performance turn learning into frustration.
MAC AFRIC welders provide stable output, clear controls, and enough adjustability to grow with your skills.
- MIG 195 Compact: Ideal for garage hobbyists working on lighter projects.
- MIG 200 Inverter: Steps up to handle thicker material and offers dual-voltage capability.
- 190A Arc Inverter: Your go-to for farm repairs and construction.
- TIG inverters: Let you tackle aluminium and stainless with confidence.
Essential Gear for Clean, Safe Welds
Auto-Darkening Helmets
An auto-darkening helmet lets you position your torch with both hands and a clear view, then reacts instantly when the arc strikes. Your beads will be straighter, and your neck will thank you.
Quality Gloves
Proper welding gloves protect your hands while maintaining enough dexterity to guide your torch smoothly.
Clamps and Fixtures
Magnetic clamps and welding clamps keep your workpieces exactly where you need them, eliminating the wobble that leads to uneven penetration.
Chipping Hammers and Wire Brushes
Especially for Stick welding, you need to remove slag between passes to avoid inclusions.
Grinding and Finishing Tools
Not every bead will be perfect. Having an angle grinder handy means you can clean up mistakes and prepare metal properly before welding.

The Learning Curve
Let’s be honest: your first few dozen beads will be ugly. This is normal. Welding is a physical skill. Your brain needs to coordinate heat input, travel speed, torch angle, and filler rod feeding simultaneously. That takes time.
But every bead you run teaches you something. You start to feel when the puddle is too hot or too cold. You recognise the sound of a good arc versus a struggling one. You develop muscle memory for consistent travel speed.
The difference between a hobbyist who gives up and one who gets competent is simply this: practice and the right equipment.
Final Thoughts
A good weld bead is uniform, properly penetrated, free from defects, and aesthetically consistent. Achieving it requires clean metal, correct settings, steady hands, and patience.
Our MAC AFRIC welders give you the stable, adjustable platform you need to develop those skills. Pair them with proper safety gear, quality consumables, and scrap metal for practice, and you'll see improvement faster than you'd expect.
Mastering bead quality isn't about natural talent. It's about repetition, observation, and having tools that don't sabotage your efforts.
Visit Adendorff Machinery Mart to explore the full range of MAC AFRIC welders, helmets, gloves, and accessories. Whether you're fixing a gate or building a trailer, the right gear matters.