Belt Sanders vs Orbital Sanders: What's the Difference?
Belt Sanders vs Orbital Sanders: What’s the Difference?
If you've ever stood in front of a wall of power tools wondering which sander to buy, you're not alone. The difference between a belt sander and an orbital sander isn't obvious when you're just starting out. But choose the wrong one, and you'll either work ten times harder than necessary or ruin your project entirely.
This guide breaks down everything you need to know. No jargon. No assumptions. Just clear answers.
What Is a Sander?
A sander is a power tool that moves abrasive material (sandpaper) across a surface to smooth it, remove material, or prepare it for finishing. Think of it as automating the exhausting work of sanding by hand.
There are dozens of sander types, but today we're focusing on the two most common: belt sanders and orbital sanders.
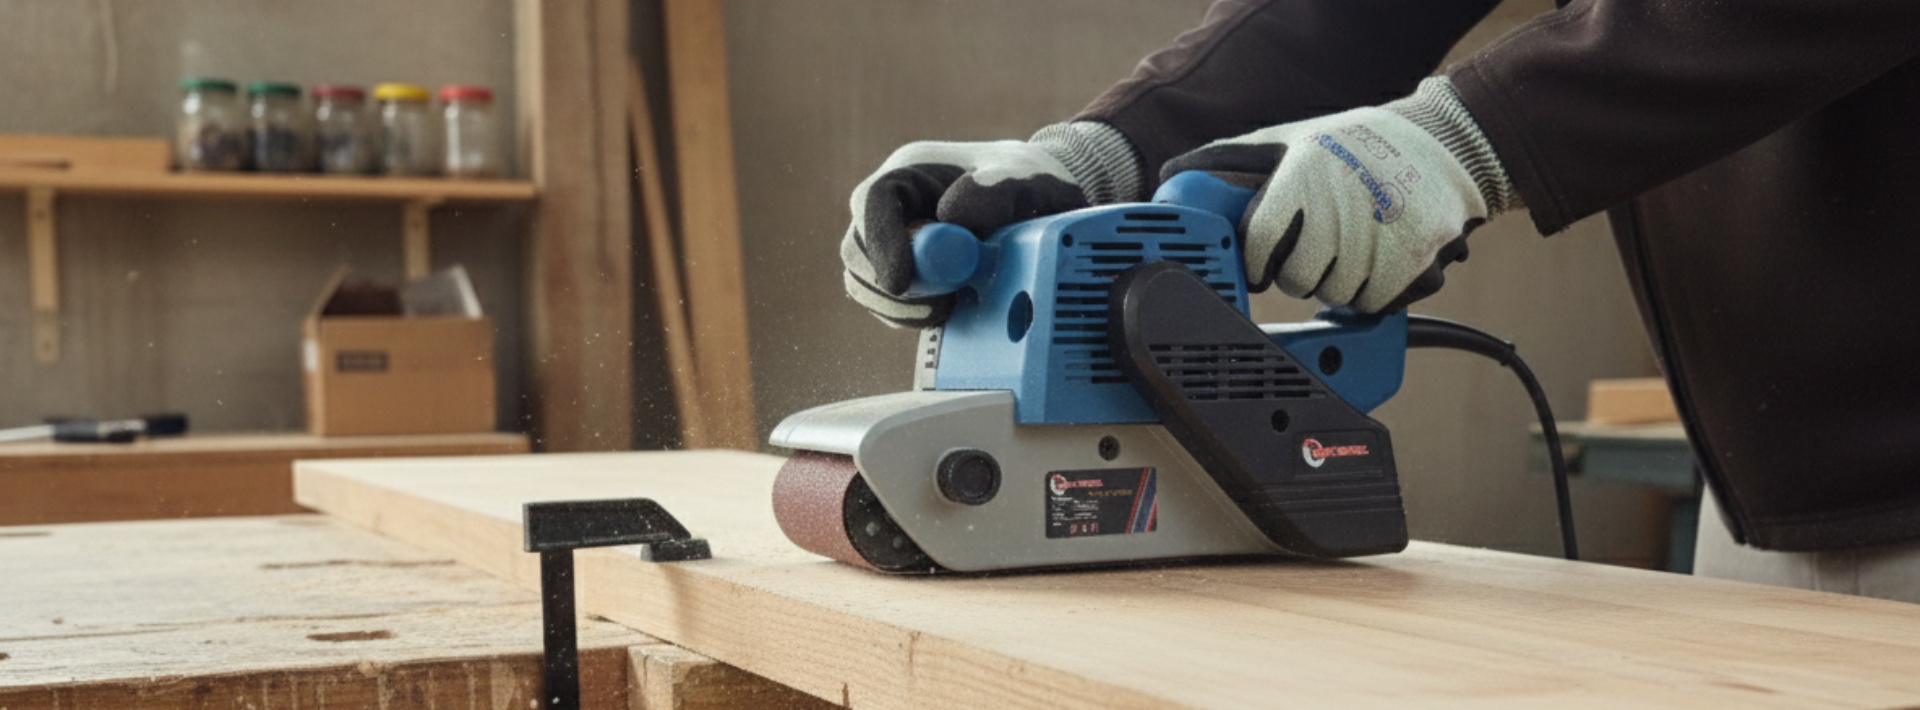
What Is a Belt Sander?
The Mechanism
A belt sander uses a continuous loop of sandpaper (the belt) stretched between two rotating drums. When you turn it on, the belt spins in one direction at high speed. You guide the sander across your workpiece, and the moving belt rapidly removes material.
Picture a tiny tank with sandpaper treads. That’s essentially a belt sander.
What It Looks Like
Belt sanders are rectangular and boxy. The sandpaper belt is visible on the bottom (the working surface). They typically have two handles: one at the back (where the motor is) and one at the front for steering. Most models have a dust collection bag attached.
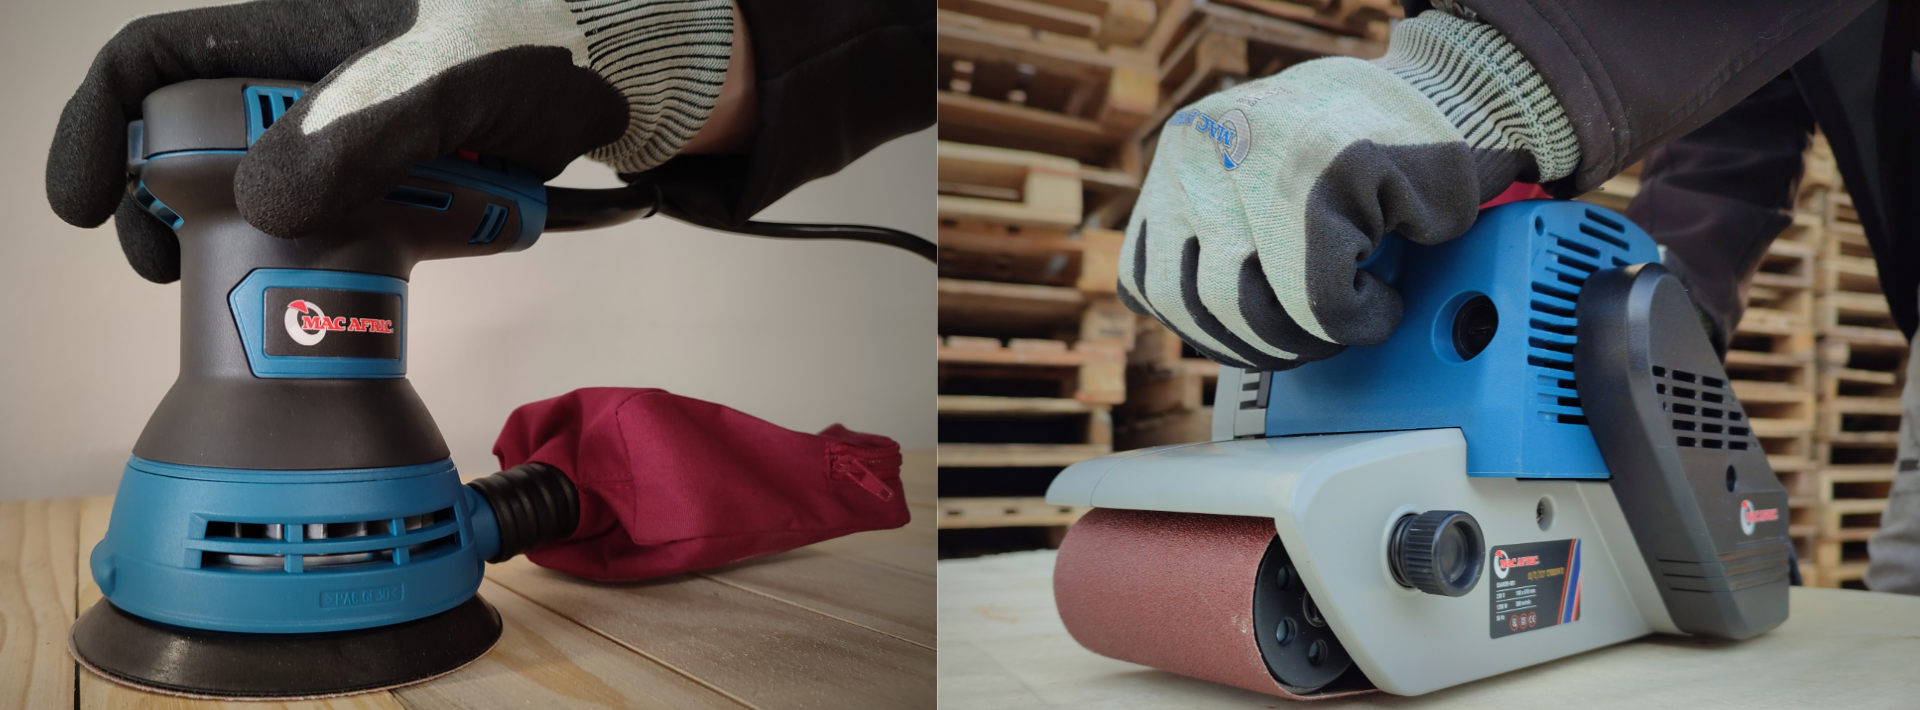
Mac Afric Belt Sanders at Adendorff
- MAC AFRIC 1200 W Semi Professional Belt Sander – A powerful option for serious workshop use
- MAC AFRIC 4" × 6" Belt Sander (WSANDS016) – A compact model suited to smaller jobs
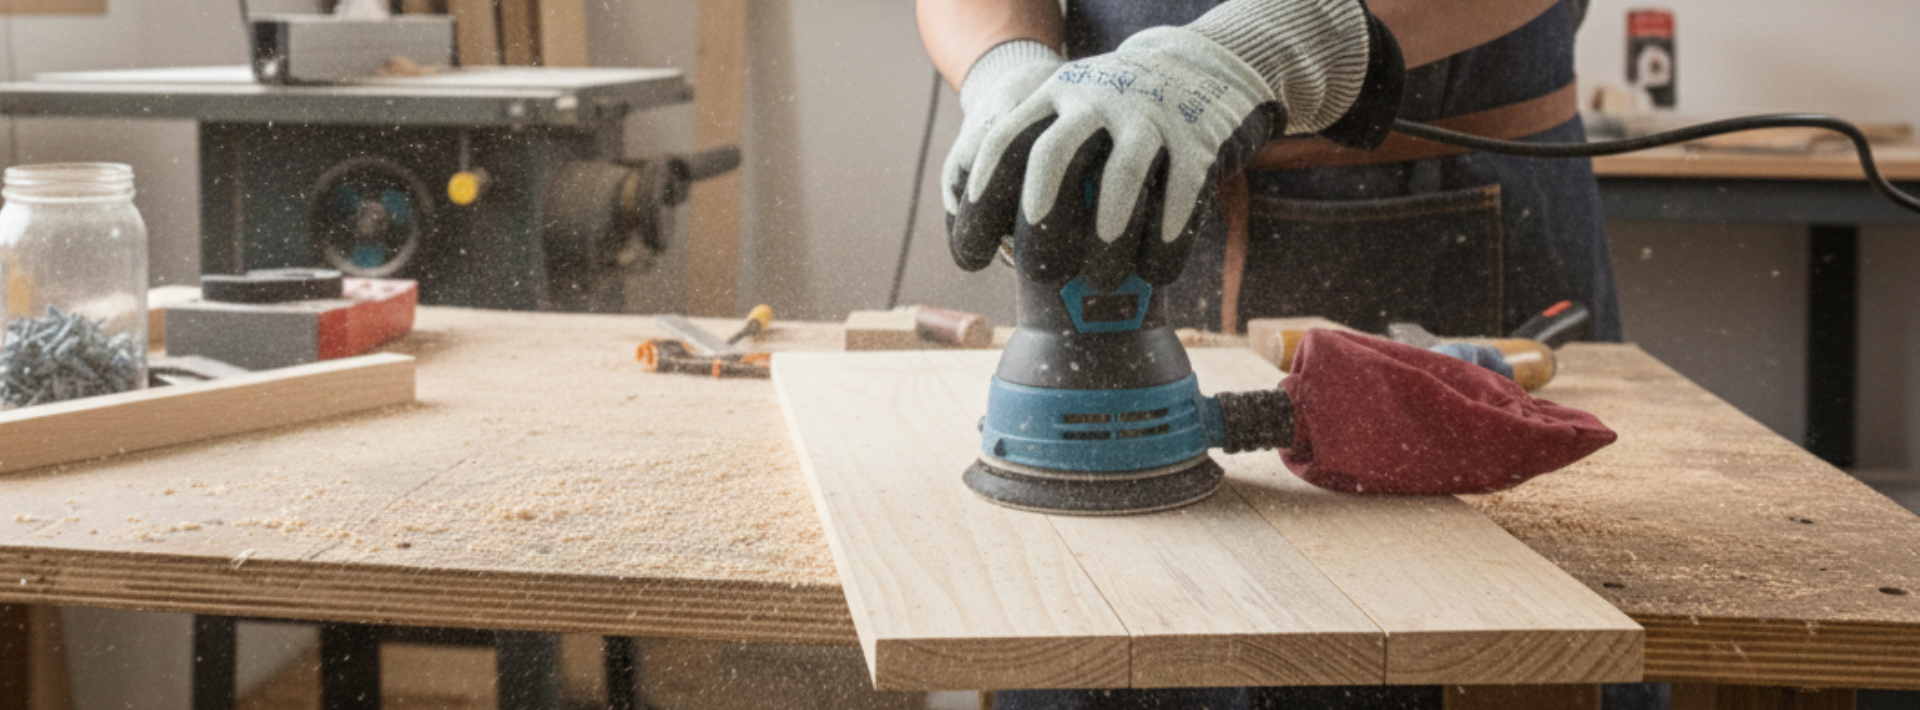
What Is an Orbital Sander?
The Mechanism
An orbital sander uses a flat sanding pad that moves in small, circular orbits (hence the name). The pad vibrates or oscillates rapidly while spinning slightly. Some versions move in random orbital patterns to avoid creating circular scratch marks.
Imagine holding a plate that’s gently spinning and vibrating at the same time. That’s the motion.
What It Looks Like
Orbital sanders are usually round or square, depending on the type. They have a single handle on top (like a computer mouse or an iron). The sanding pad sits flat on the bottom, and sandpaper sheets or discs attach with clips, Velcro, or adhesive backing.
Mac Afric Orbital Sanders at Adendorff
- MAC AFRIC Random Orbital Sander 300 W (SSANDR001) – Electric, ideal for DIY and finishing work
- MAC AFRIC Pneumatic Orbital Sander (ASANDA020) – Air-powered, great for workshop environments
Why the Difference Matters
The distinction isn't academic. These tools behave completely differently and are designed for opposite ends of the sanding spectrum.
Belt Sander: The Workhorse
Belt sanders are aggressive. They remove material fast. Very fast. If you need to strip paint from a door, level a warped floorboard, or flatten the edge of a thick timber plank, a belt sander will do it in minutes.
But that aggression comes with risk. A belt sander can gouge wood, create valleys, or sand through veneer in seconds if you're not careful. It's not a tool for delicate work.
Orbital Sander: The Finisher
Orbital sanders are gentle. They remove material slowly and evenly, which makes them perfect for fine sanding, smoothing surfaces between coats of paint, or preparing wood for staining. You'd use an orbital sander to make something feel silky smooth, not to reshape it.
The trade-off? They're slow when you need to remove a lot of material. Using an orbital sander to strip paint off a table would take hours.
Which Sander for Which Job?
| Task | Best Tool | Why |
|---|---|---|
| Removing old paint or varnish | Belt sander | Fast material removal |
| Levelling uneven wooden surfaces | Belt sander | Aggressive cutting power |
| Flattening door edges | Belt sander | Shaping control |
| Smoothing rough timber | Both (start with belt, finish with orbital) | Best of both worlds |
| Sanding between coats | Orbital sander | Even, fine sanding |
| Preparing bare wood | Orbital sander | Scratch-free finish |
| Refinishing furniture | Orbital sander | Delicate touch |
How Each Sander Works: Step-by-Step
Using a Belt Sander
- Secure your workpiece. Belt sanders are powerful and can pull themselves (and you) across the surface if it's not clamped down.
- Choose the right grit. Start with coarse grit (40–60) for heavy material removal, medium grit (80–120) for shaping, or fine grit (150–220) for smoothing.
- Turn the sander on before contact. Let it reach full speed, then gently lower it onto the surface. Never start a belt sander while it's resting on the wood.
- Keep it moving. A stationary belt sander will dig a trench in seconds. Move steadily in the direction of the grain (with the wood's natural lines, not across them).
- Let the tool do the work. Don't press down. The weight of the sander is enough. Pushing harder doesn't sand faster; it just makes the tool harder to control.
- Overlap your passes. Move in straight lines, overlapping each pass by about half the width of the sander to avoid ridges.
Using an Orbital Sander
- Attach the sandpaper. Most orbital sanders use hook-and-loop (Velcro) discs. Align the holes in the paper with the holes in the pad (for dust extraction).
- Start with the right grit. For smoothing, start at 120 or 150 grit. For final finishing, use 220 grit or higher.
- Turn it on, then make contact. Like the belt sander, let it reach speed first.
- Move slowly and evenly. You can work in any direction (random orbital sanders eliminate directional scratches), but slow, overlapping movements give the best results.
- Use light pressure. Again, the tool's own weight is usually sufficient. Pressing harder generates heat, clogs the sandpaper, and doesn't sand faster.
- Change paper regularly. Worn sandpaper stops cutting and just polishes. If you see dust but no progress, change the disc.
When to Use Each: Real-World Scenarios

You're Building a Deck
Belt sander: Use it to smooth rough deck boards before installation or to level boards that don't sit flush after they're laid.
Orbital sander: Use it to lightly sand handrails and finished surfaces before applying stain or sealant.
You're Restoring an Old Wooden Table
Belt sander: Strip off the old varnish and level any uneven spots or water damage. Work carefully to avoid removing too much wood.
Orbital sander: After the belt sander, switch to an orbital with fine-grit paper (180–220) to remove belt sander scratches and create a smooth surface for the new finish.
You're Preparing a Wall for Painting
Belt sander: Not typically used for walls unless you're sanding down joint compound on drywall (and even then, caution is essential).
Orbital sander: Perfect for lightly sanding walls between coats of paint or smoothing filled nail holes.
You're Making Furniture from Scratch
Belt sander: Flatten and smooth rough timber before assembly. Remove saw marks and bring boards to final thickness if you don't have a planer.
Orbital sander: Use it for all the final smoothing before finishing. This is where the orbital sander shines.
Detailed Comparison Table
| Feature | Belt Sander | Orbital Sander |
|---|---|---|
| Material removal rate | Very fast | Slow to moderate |
| Typical power | 600–1200+ watts | 200–450 watts |
| Primary use | Heavy stock removal, shaping, levelling | Smoothing, finishing, fine sanding |
| Risk of damage | High (can gouge or create dips easily) | Low (gentle, even sanding) |
| Best for beginners? | No (requires practice and control) | Yes (forgiving and easy to control) |
| Sanding pattern | Linear (in one direction) | Circular or random orbital |
| Leaves scratch marks? | Yes, must sand with the grain | Minimal (random orbital especially) |
| Suitable for curved surfaces? | No | Yes |
| Suitable for edges and details? | Difficult | Easy |
| Dust generation | High | Moderate |
| Weight | Heavier (2.5–5 kg) | Lighter (1–2.5 kg) |
| Typical belt/disc size | 75–100 mm × 457–610 mm | 125–150 mm diameter (or square pads) |
| Abrasive replacement cost | Moderate to high (belts) | Low (discs are inexpensive) |
| Noise level | Loud | Moderate |
Grit Guide: Which Sandpaper for What?
| Grit Range | Classification | Belt Sander Use | Orbital Sander Use |
|---|---|---|---|
| 40–60 | Coarse | Paint removal, heavy shaping, rust removal | Not typically used |
| 80–100 | Medium | General smoothing, removing mill marks | Not typically used |
| 120–150 | Fine | Pre-finishing, smoothing between grits | Starting grit for smoothing raw wood |
| 180–220 | Very fine | Rarely used on belt sanders | Final smoothing before finish |
| 240+ | Extra fine | Not used | Between coats of finish, ultra-smooth results |
Common Mistakes (and How to Avoid Them)
Belt Sander Mistakes
- Starting on the workpiece: Never rest a belt sander on wood and then turn it on. It will immediately gouge the surface. Always start it in the air, then lower it down.
- Sanding across the grain: Always sand with the grain to avoid deep scratches.
- Staying in one spot: Even a second of hesitation will create a dip. Keep the sander moving constantly.
- Pressing too hard: Let the tool work. Pressing doesn't speed things up and can cause uneven sanding.
Orbital Sander Mistakes
- Using worn sandpaper too long: Change discs regularly to maintain efficiency.
- Sanding only in one direction: Move in slow, overlapping patterns across the surface.
- Expecting speed: Orbital sanders are slow by design. Pressing harder won’t help.
- Ignoring dust extraction: Always use the dust bag or vacuum to protect your lungs and improve visibility.
The Hybrid Approach: Why You Might Need Both
In professional workshops and serious DIY setups, most people own both types of sander. Here's why:
- Stage 1: Heavy work (belt sander) – Strip finishes, level surfaces, remove major imperfections, flatten edges.
- Stage 2: Fine work (orbital sander) – Remove belt sander scratches, smooth between coats, prepare for finishing.
If you're starting out and can only afford one, the orbital sander is more versatile and forgiving. You'll work slower on heavy jobs, but you won't risk ruining your projects.
If you're working with rough timber, old furniture, or any project involving significant material removal, the belt sander becomes essential. You'll save hours of manual labour.
Power vs Pneumatic: A Quick Note
Most DIY users will choose electric sanders (they plug into a wall socket). But Adendorff also stocks pneumatic sanders, like the MAC AFRIC Pneumatic Orbital Sander (ASANDA020).
Pneumatic (air-powered) tools require an air compressor. They're lighter, more powerful for their size, and better suited to continuous professional use. But they're not practical for home workshops unless you already own a compressor.
Electric tools are plug-and-play. No compressor needed. They're heavier but much more convenient for occasional use.
Visualising the Differences
Material Removal Comparison
Belt Sander:          ████████████████████ (very fast)
Orbital Sander:       ████ (slow)
Manual Sanding:       █ (very slow)

Scratch Depth Comparison
Belt Sander (coarse): ━━━━━━━━━━ (deep scratches)
Belt Sander (fine):   ──────── (moderate scratches)
Orbital Sander:       ............ (fine scratches)

Learning Curve
Belt Sander:          ████████ (difficult to master)
Orbital Sander:       ██ (beginner-friendly)
The Bottom Line: Which One Should You Buy?
Choose a belt sander if:
- You work with rough or reclaimed timber regularly
- You need to remove paint, varnish, or finishes quickly
- You're comfortable with power tools and understand the risks
- You have projects that require shaping or levelling wood
Choose an orbital sander if:
- You're new to power tools
- Most of your work involves smoothing or finishing
- You work with furniture, cabinets, or detailed projects
- You want a single tool that handles 80% of sanding tasks safely
Buy both if:
- You're setting up a workshop for regular woodworking
- You restore furniture or work with raw timber often
- You want the most efficient tool for every stage of a project
Final Thoughts
The difference between a belt sander and an orbital sander comes down to this: belt sanders remove material aggressively and quickly but require skill to control. Orbital sanders work slowly and gently but are nearly impossible to mess up with.
Neither is better. They're designed for different jobs. Use a belt sander when you need to reshape or strip something. Use an orbital sander when you need to make something smooth.
And if you're not sure which one a job requires, start with the orbital. You'll work slower, but you won't accidentally sand a hole through your project.
Belt Sanders vs Orbital Sanders: What’s the Difference?
If you've ever stood in front of a wall of power tools wondering which sander to buy, you're not alone. The difference between a belt sander and an orbital sander isn't obvious when you're just starting out. But choose the wrong one, and you'll either work ten times harder than necessary or ruin your project entirely.
This guide breaks down everything you need to know. No jargon. No assumptions. Just clear answers.
What Is a Sander?
A sander is a power tool that moves abrasive material (sandpaper) across a surface to smooth it, remove material, or prepare it for finishing. Think of it as automating the exhausting work of sanding by hand.
There are dozens of sander types, but today we're focusing on the two most common: belt sanders and orbital sanders.
What Is a Belt Sander?
The Mechanism
A belt sander uses a continuous loop of sandpaper (the belt) stretched between two rotating drums. When you turn it on, the belt spins in one direction at high speed. You guide the sander across your workpiece, and the moving belt rapidly removes material.
Picture a tiny tank with sandpaper treads. That’s essentially a belt sander.
What It Looks Like
Belt sanders are rectangular and boxy. The sandpaper belt is visible on the bottom (the working surface). They typically have two handles: one at the back (where the motor is) and one at the front for steering. Most models have a dust collection bag attached.
Mac Afric Belt Sanders at Adendorff
- MAC AFRIC 1200 W Semi Professional Belt Sander – A powerful option for serious workshop use
- MAC AFRIC 4" × 6" Belt Sander (WSANDS016) – A compact model suited to smaller jobs
What Is an Orbital Sander?
The Mechanism
An orbital sander uses a flat sanding pad that moves in small, circular orbits (hence the name). The pad vibrates or oscillates rapidly while spinning slightly. Some versions move in random orbital patterns to avoid creating circular scratch marks.
Imagine holding a plate that’s gently spinning and vibrating at the same time. That’s the motion.
What It Looks Like
Orbital sanders are usually round or square, depending on the type. They have a single handle on top (like a computer mouse or an iron). The sanding pad sits flat on the bottom, and sandpaper sheets or discs attach with clips, Velcro, or adhesive backing.
Mac Afric Orbital Sanders at Adendorff
- MAC AFRIC Random Orbital Sander 300 W (SSANDR001) – Electric, ideal for DIY and finishing work
- MAC AFRIC Pneumatic Orbital Sander (ASANDA020) – Air-powered, great for workshop environments
Why the Difference Matters

The distinction isn't academic. These tools behave completely differently and are designed for opposite ends of the sanding spectrum.
Belt Sander: The Workhorse
Belt sanders are aggressive. They remove material fast. Very fast. If you need to strip paint from a door, level a warped floorboard, or flatten the edge of a thick timber plank, a belt sander will do it in minutes.
But that aggression comes with risk. A belt sander can gouge wood, create valleys, or sand through veneer in seconds if you're not careful. It's not a tool for delicate work.
Orbital Sander: The Finisher
Orbital sanders are gentle. They remove material slowly and evenly, which makes them perfect for fine sanding, smoothing surfaces between coats of paint, or preparing wood for staining. You'd use an orbital sander to make something feel silky smooth, not to reshape it.
The trade-off? They're slow when you need to remove a lot of material. Using an orbital sander to strip paint off a table would take hours.
Which Sander for Which Job?
| Task | Best Tool | Why |
|---|---|---|
| Removing old paint or varnish | Belt sander | Fast material removal |
| Levelling uneven wooden surfaces | Belt sander | Aggressive cutting power |
| Flattening door edges | Belt sander | Shaping control |
| Smoothing rough timber | Both (start with belt, finish with orbital) | Best of both worlds |
| Sanding between coats | Orbital sander | Even, fine sanding |
| Preparing bare wood | Orbital sander | Scratch-free finish |
| Refinishing furniture | Orbital sander | Delicate touch |
How Each Sander Works: Step-by-Step
Using a Belt Sander
- Secure your workpiece. Belt sanders are powerful and can pull themselves (and you) across the surface if it's not clamped down.
- Choose the right grit. Start with coarse grit (40–60) for heavy material removal, medium grit (80–120) for shaping, or fine grit (150–220) for smoothing.
- Turn the sander on before contact. Let it reach full speed, then gently lower it onto the surface. Never start a belt sander while it's resting on the wood.
- Keep it moving. A stationary belt sander will dig a trench in seconds. Move steadily in the direction of the grain (with the wood's natural lines, not across them).
- Let the tool do the work. Don't press down. The weight of the sander is enough. Pushing harder doesn't sand faster; it just makes the tool harder to control.
- Overlap your passes. Move in straight lines, overlapping each pass by about half the width of the sander to avoid ridges.
Using an Orbital Sander
- Attach the sandpaper. Most orbital sanders use hook-and-loop (Velcro) discs. Align the holes in the paper with the holes in the pad (for dust extraction).
- Start with the right grit. For smoothing, start at 120 or 150 grit. For final finishing, use 220 grit or higher.
- Turn it on, then make contact. Like the belt sander, let it reach speed first.
- Move slowly and evenly. You can work in any direction (random orbital sanders eliminate directional scratches), but slow, overlapping movements give the best results.
- Use light pressure. Again, the tool's own weight is usually sufficient. Pressing harder generates heat, clogs the sandpaper, and doesn't sand faster.
- Change paper regularly. Worn sandpaper stops cutting and just polishes. If you see dust but no progress, change the disc.
When to Use Each: Real-World Scenarios

You're Building a Deck
Belt sander: Use it to smooth rough deck boards before installation or to level boards that don't sit flush after they're laid.
Orbital sander: Use it to lightly sand handrails and finished surfaces before applying stain or sealant.
You're Restoring an Old Wooden Table
Belt sander: Strip off the old varnish and level any uneven spots or water damage. Work carefully to avoid removing too much wood.
Orbital sander: After the belt sander, switch to an orbital with fine-grit paper (180–220) to remove belt sander scratches and create a smooth surface for the new finish.
You're Preparing a Wall for Painting
Belt sander: Not typically used for walls unless you're sanding down joint compound on drywall (and even then, caution is essential).
Orbital sander: Perfect for lightly sanding walls between coats of paint or smoothing filled nail holes.
You're Making Furniture from Scratch
Belt sander: Flatten and smooth rough timber before assembly. Remove saw marks and bring boards to final thickness if you don't have a planer.
Orbital sander: Use it for all the final smoothing before finishing. This is where the orbital sander shines.
Detailed Comparison Table
| Feature | Belt Sander | Orbital Sander |
|---|---|---|
| Material removal rate | Very fast | Slow to moderate |
| Typical power | 600–1200+ watts | 200–450 watts |
| Primary use | Heavy stock removal, shaping, levelling | Smoothing, finishing, fine sanding |
| Risk of damage | High (can gouge or create dips easily) | Low (gentle, even sanding) |
| Best for beginners? | No (requires practice and control) | Yes (forgiving and easy to control) |
| Sanding pattern | Linear (in one direction) | Circular or random orbital |
| Leaves scratch marks? | Yes, must sand with the grain | Minimal (random orbital especially) |
| Suitable for curved surfaces? | No | Yes |
| Suitable for edges and details? | Difficult | Easy |
| Dust generation | High | Moderate |
| Weight | Heavier (2.5–5 kg) | Lighter (1–2.5 kg) |
| Typical belt/disc size | 75–100 mm × 457–610 mm | 125–150 mm diameter (or square pads) |
| Abrasive replacement cost | Moderate to high (belts) | Low (discs are inexpensive) |
| Noise level | Loud | Moderate |
Grit Guide: Which Sandpaper for What?
| Grit Range | Classification | Belt Sander Use | Orbital Sander Use |
|---|---|---|---|
| 40–60 | Coarse | Paint removal, heavy shaping, rust removal | Not typically used |
| 80–100 | Medium | General smoothing, removing mill marks | Not typically used |
| 120–150 | Fine | Pre-finishing, smoothing between grits | Starting grit for smoothing raw wood |
| 180–220 | Very fine | Rarely used on belt sanders | Final smoothing before finish |
| 240+ | Extra fine | Not used | Between coats of finish, ultra-smooth results |
Common Mistakes (and How to Avoid Them)
Belt Sander Mistakes
- Starting on the workpiece: Never rest a belt sander on wood and then turn it on. It will immediately gouge the surface. Always start it in the air, then lower it down.
- Sanding across the grain: Always sand with the grain to avoid deep scratches.
- Staying in one spot: Even a second of hesitation will create a dip. Keep the sander moving constantly.
- Pressing too hard: Let the tool work. Pressing doesn't speed things up and can cause uneven sanding.
Orbital Sander Mistakes
- Using worn sandpaper too long: Change discs regularly to maintain efficiency.
- Sanding only in one direction: Move in slow, overlapping patterns across the surface.
- Expecting speed: Orbital sanders are slow by design. Pressing harder won’t help.
- Ignoring dust extraction: Always use the dust bag or vacuum to protect your lungs and improve visibility.
The Hybrid Approach: Why You Might Need Both

In professional workshops and serious DIY setups, most people own both types of sander. Here's why:
- Stage 1: Heavy work (belt sander) – Strip finishes, level surfaces, remove major imperfections, flatten edges.
- Stage 2: Fine work (orbital sander) – Remove belt sander scratches, smooth between coats, prepare for finishing.
If you're starting out and can only afford one, the orbital sander is more versatile and forgiving. You'll work slower on heavy jobs, but you won't risk ruining your projects.
If you're working with rough timber, old furniture, or any project involving significant material removal, the belt sander becomes essential. You'll save hours of manual labour.
Power vs Pneumatic: A Quick Note
Most DIY users will choose electric sanders (they plug into a wall socket). But Adendorff also stocks pneumatic sanders, like the MAC AFRIC Pneumatic Orbital Sander (ASANDA020).
Pneumatic (air-powered) tools require an air compressor. They're lighter, more powerful for their size, and better suited to continuous professional use. But they're not practical for home workshops unless you already own a compressor.
Electric tools are plug-and-play. No compressor needed. They're heavier but much more convenient for occasional use.
Visualising the Differences
Material Removal Comparison
Belt Sander:          ████████████████████ (very fast)
Orbital Sander:       ████ (slow)
Manual Sanding:       █ (very slow)

Scratch Depth Comparison
Belt Sander (coarse): ━━━━━━━━━━ (deep scratches)
Belt Sander (fine):   ──────── (moderate scratches)
Orbital Sander:       ............ (fine scratches)

Learning Curve
Belt Sander:          ████████ (difficult to master)
Orbital Sander:       ██ (beginner-friendly)
The Bottom Line: Which One Should You Buy?
Choose a belt sander if:
- You work with rough or reclaimed timber regularly
- You need to remove paint, varnish, or finishes quickly
- You're comfortable with power tools and understand the risks
- You have projects that require shaping or levelling wood
Choose an orbital sander if:
- You're new to power tools
- Most of your work involves smoothing or finishing
- You work with furniture, cabinets, or detailed projects
- You want a single tool that handles 80% of sanding tasks safely
Buy both if:
- You're setting up a workshop for regular woodworking
- You restore furniture or work with raw timber often
- You want the most efficient tool for every stage of a project
Final Thoughts
The difference between a belt sander and an orbital sander comes down to this: belt sanders remove material aggressively and quickly but require skill to control. Orbital sanders work slowly and gently but are nearly impossible to mess up with.
Neither is better. They're designed for different jobs. Use a belt sander when you need to reshape or strip something. Use an orbital sander when you need to make something smooth.
And if you're not sure which one a job requires, start with the orbital. You'll work slower, but you won't accidentally sand a hole through your project.